Brocade Openstack VDX Plugin (Non AMPP)
This describes the provisioning of MTU and Native VLANS on L2 interfaces using Brocade (Non
https://github.com/openstack/networking-brocade/tree/master/networking_brocade/vdx
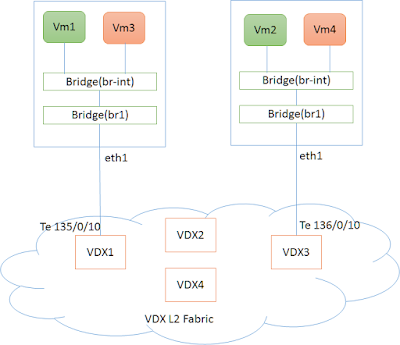
Fig 1. Setup of VDX Fabric with Compute Nodes
The figure(fig 1) shows a typical Physical deployment of Servers(Compute Nodes) connected to VDX L2 Fabric.
- eth1 on the controller Node is connected to VDX interface (e.g Te 135/0/10)
- eth1 on the compute Node is connected to VDX interface (e.g Te 136/0/10)
- NIC (eth1) on the servers (controller,compute ) are part of OVS bridge br1.
Note: To create bridge br1 on compute Nodes and add port eth1 to it.
sudo ovs-vsctl add-br br1
sudo ovs-vsctl add-port br1 eth1
In this setup, Virtual Machines would be created on each of the host servers(controller,compute) on a network by the name Green (10.0.0.0/24)
Setup of Openstack Plugin
Look at the setup of Openstack Plugin for L2 Non AMPP
http://rmadapur.blogspot.in/2016/04/l2-non-ampp-brocade-vdx-plugin.html
Openstack Controller Configurations (L2 Non AMPP Setup)
Refer to Configuration setup for [ml2] described in L2 Non AMPP
http://rmadapur.blogspot.in/2016/04/l2-non-ampp-brocade-vdx-plugin.html
Additional configurations that needs to be done to setup mtu and native vlans.
Following additional configuration lines for the VDX Fabric needs to be added to either ‘/etc/neutron/plugins/ml2/ml2_conf_brocade.ini’ or ‘/etc/neutron/plugins/ml2/ml2_conf.ini’.
If added to ‘/etc/neutron/plugins/ml2/ml2_conf_brocade.ini’ then this file should be given as config parameter during neutron-server startup.
[ml2]
segment_mtu = 2000
physical_network_mtus = physnet1:2000

[topology]
#connections=<host-name> : <physical network name>: <PORT-SPEED> <NOS PORT>
connections = controller:physnet1:Te:135/0/10, compute:physnet1:Te:136/0/10
mtu = Te:135/0/10:2000,Te:136/0/10:2000
native_vlans = Te:135/0/10:20,Te:136/0/10:20
[topology] - entries
- Here mtu is set 2000 for both interfaces connected to the servers
- native_vlan on the interface is set to 20
Openstack CLI Comands
Create Networks
Create a GREEN Network (10.0.0.0/24) using neutron CLI’s. Note down the id of the network created which will be used during subsequent nova boot commands.
user@controller:~$ neutron net-create GREEN_NETWORK
user@controller:~$ neutron subnet-create GREEN_NETWORK 10.0.0.0/24 --name GREEN_SUBNET --gateway=10.0.0.1
user@controller:~/devstack$ neutron net-show GREEN_NETWORK
+---------------------------+--------------------------------------+
| Field                     | Value                                |
+---------------------------+--------------------------------------+
| admin_state_up            | True                                 |
| availability_zone_hints   |                                      |
| availability_zones        | nova                                 |
| created_at                | 2016-04-15T05:41:13                  |
| description               |                                      |
| id                        | 21307c5c-b7e9-4bdc-a59c-1527e02080ff |
| ipv4_address_scope        |                                      |
| ipv6_address_scope        |                                      |
| mtu                       | 2000                                 |
| name                      | GREEN_NETWORK                        |
| port_security_enabled     | True                                 |
| provider:network_type     | vlan                                 |
| provider:physical_network | physnet1                             |
| provider:segmentation_id  | 50                                    |
| router:external           | False                                |
| shared                    | False                                |
| status                    | ACTIVE                               |
| subnets                   | d310745c-2726-4b79-adac-39e76e8d9b29 |
| tags                      |                                      |
| tenant_id                 | 23b20c38f7f14c2a8be5073c198c5178     |
| updated_at                | 2016-04-15T05:41:13                  |
+---------------------------+--------------------------------------+
Check the availability Zones, We will launch one VM each on one of the servers.
user@controller:~$ nova availability-zone-list
+-----------------------+----------------------------------------+
| Name                  | Status                                 |
+-----------------------+----------------------------------------+
| internal              | available                              |
| |- controller         |                                        |
| | |- nova-conductor   | enabled :-) 2016-04-11T05:10:06.000000 |
| | |- nova-scheduler   | enabled :-) 2016-04-11T05:10:07.000000 |
| | |- nova-consoleauth | enabled :-) 2016-04-11T05:10:07.000000 |
| nova                  | available                              |
| |- compute            |                                        |
| | |- nova-compute     | enabled :-) 2016-04-11T05:10:10.000000 |
| |- controller         |                                        |
| | |- nova-compute     | enabled :-) 2016-04-11T05:10:05.000000 |
+-----------------------+----------------------------------------+
Launching Virtual Machines
Boot VM1 on Server by the name “controller”
user@controller:~$nova boot --nic net-id=$(neutron net-list | awk '/GREEN_NETWORK/ {print $2}')
 --image cirros-0.3.4-x86_64-uec --flavor m1.tiny --availability-zone nova:controller VM1
Boot VM2 on Server by the name “compute”
user@controller:~$nova boot --nic net-id=$(neutron net-list | awk '/GREEN_NETWORK/ {print $2}')
 --image cirros-0.3.4-x86_64-uec --flavor m1.tiny --availability-zone nova:compute VM2
VDX
Following L2 Networking entries would be created on VDX Switches.
sw0# show running-config interface TenGigabitEthernet 135/0/10
interface TenGigabitEthernet 135/0/10
 mtu 2000
 switchport
 switchport mode trunk
 switchport trunk allowed vlan add 50
 no switchport trunk tag native-vlan
 switchport trunk native-vlan 20
 spanning-tree shutdown
 fabric isl enable
 fabric trunk enable
 no shutdown
!
sw0# show running-config interface TenGigabitEthernet 136/0/10
interface TenGigabitEthernet 136/0/10
 mtu 2000
 switchport
 switchport mode trunk
 switchport trunk allowed vlan add 50
 no switchport trunk tag native-vlan
 switchport trunk native-vlan 20
 spanning-tree shutdown
 fabric isl enable
 fabric trunk enable
 no shutdown
!
sw0#
Ping between Virtual Machines across Hosts
We should now be able to ping between Virtual Machines on the two host servers.
